return to home. Back to Atari Email

my FUJICASE

I had been wanting to build a neat case for my 800XL. I wanted to put many of the upgrades I have spread among several machines into one. I didn't want the ugly flat boxes other machines come in. I wanted something neat. It occurred one day thast the Atari Fuji symbol would make a great case. So I went about designing one. It turns out to be 18" square and 8" deep. I wanted a material that was a little translucent, a little soft, and a little scratch resistant. I ended up with HDPE-high density polyethelyne. One 2 X 4 sheet each of 3/8" and 1/4" cost me about $60.00. I found out that this stuff can't be glued or epoxyed. It must be mechanically fastened. After some thinking I decided I needed to cut grooves into the material. The only way to that accurately was to use a router. And that required templates. So I ended up building a frame to hold the cut out Fuji shaped front and back pieces and the masonite templates. My original design called for a frame for each template, with alignment holes. As I was making the templates, I realised that the scraps could be turn into wedges that I could glue onto the back of each template. This would lock the workpiece into it. This was a much better method. Each template would also require locating and cutting slots and holes for the router with guide bushings. I ended up with 8 templates. Since my precision is not great, I had to do the front and back pieces seperately(I had already cut them out and they were not exactly the same-sigh). The pics and descriptions below are introductory. Click the pic for more in depth info and better view.

Note that I have also done a mockup for a "tower" case that sits on the floor that can also hold an ST.

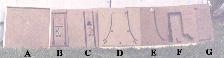
Here are the pictures. Note that I will have pics with measured drawings a little later.
Click the pic for a larger view and many more details.

templates.
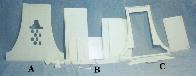
Here are the Templates and frame.

gussets
Here is a closeup of one template.

Mostly finished pieces.
Here are the cut and routed plastic pieces.

Inside front.
This is a closeup of the front with the mounting blocks slid into dovetail slots.

Front view.
This is the front of the (dry fit) assembled case.

Back view.
This is the view of the (dry fit) assembled back.

Controls
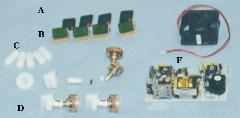
This is a shot of the controls, displays, the power supply, and fan.


06MAY2K:I spent most of April putting the case together. All of the assembly was new. All unknown. So each item averaged several days to do. Run the side panels through my saw and router to cut them down to slats to better fit the entire curve. Locating the mount blocks. Locating and installing the top handle. Mounting the pushbuttons and logo board(the pushbuttons light up and had to be made from scratch). Locating and modifying the XL to fit(I still have the cables to make). Designing, locating, and building the connector panel. Locating the power supply and vent holes. Since the connector panel takes up half the depth, the floppy drive ended up in my alternate position-on the main back access panel. So I had to locate the mounts and the flip down hinges(I had to customize). I had to finalize the rotary switches(with custom knobs) and build a panel for them. Same to the alpha numeric displays. For the JYBOLAC(May2000) meeting, I rigged one display, the pushbuttons and logo LEDS, and the fan to work from a 12 volt battery source. Still a lot of work to do! I am keeping a notebook as I work.


top of page Page 2