Hardware projects for the Atari PORTFOLIO I have done and plan to do.
Extending low battery protection:

This involves adding a goldcap into the sram battery power circuit. I used a .33 farad cap to support the 2 68 microfarad caps already there. Adding 2400+ times more capacity extends the low power protection to 5 to 7 days!
Clock Speed change:
This simply involves replacing the 4.9mHz crystal with a 6.5mHz crystal.
Backlight:
I wanted to find a way to light up the ldc display, it is hard to read except in good lighting. I finally found a site(www.palmzip.de) that had kits made up for about $35.00. This used an extrememly thin ElectroLuminescent foil as the light source, and a really small inverter. I bought the yellow version as on or off, it offers more contrast. It makes an enourmous difference. Really easy to read in any light.
The instructions are in German. But a note says that similar instructions for an HP are at www.daniel-hertrich.de/backlight/install(its a big page, lots of pictures). This is where the "fear" comes in. You have to take apart the display, remove the metal frame, carefully slice the conductive strip from the pcb(not the lcd!), and the bottom spacer too. Then, you have to carefully and slowly peel back the foil reflector from the back of the lcd. Do not remove the polarizer! I found all of the adhesive was on the foil, none on the polarizer. To the EL foil, I spread a layer of thin white glue on glass and dipped the three plain edges to seal them. I attached the conductive copper strips, folded them, tinned with solder and solder the inverter, folded the wires toward the EL and then folded the inverter back to the outside so the chip was down. I also replaced the power wires with thinner wire wrap wire, easier to place. I used packing tape to cover the back of the el foil/contacts/inverter bottom. If your polarizer is sticky(test with clean plastic spoon-don't touch!), then you may want to cover it with tape as well-be careful-bubbles show. Once done, it can be placed with the lcd, and all folded back to the display board. Some alignment of the top contacts can be made visually, but in order to actually get the display aligned, the frame must be pushed back on, the board hooked up to the images board and the pofo turned on. Make sure no dots are missing on the left side. Do not worry about light or missing dots towards the right. Pushing on the frame should make the missing dots appear. Pofo off..Once aligned, the frame tabs can be twisted. Pofo on..if any lcd areas are light, tighten tab. You can test the el foil at any time using a 6 volt battery. Go slowly. Do not get anything dirty/smudged. Make sure the contact strip and pcb fingers are clean! Gently clean the back of the LCD before reassembling.
I wired the switch below the inverter, use hot glue to fasten, and soldered the power to the surface capacitor below that. Then the cover has to be ground out for everything to fit. I used a battery Dremel(C). A slot for the power switch is needed too.
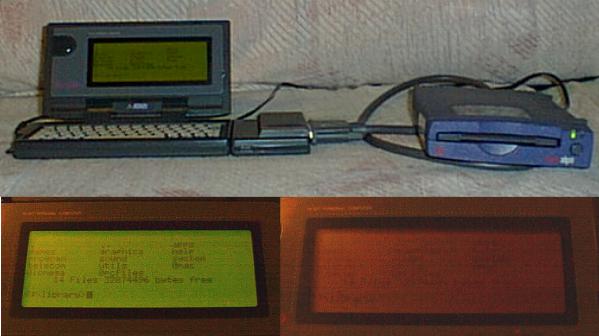
Mass Storage:
I have tried modeming files to the pofo. Really slow. The memory cards are really small capacity too. The PC card drive only likes an old DOS machine, which I don't have set up yet. I have a 30+ meg library, what to do? I found a note that the IOMEGA parallel port 100 meg Zip drive can be attached to the parallel port to access all of that storage. So I started looking around. I found the drive. I found the Iomega DOS drivers, but they didn't work on the pofo. I finally found a site(www.palmzip.de) that had a specially modified driver package with a Pofo version for $12.50. This package also has a patch for the mkdir command so it works with drives greater than 2 megs, a formatter, Zipman(splits the 100 meg disk into 3 33 meg partitions), and a partition copier, Zipcopy(you can hook the drive to a PC and with the Iomega drivers, it sees the first partition. You copy files to it, then copy the partition over to either of the other two after hooking it back up to the pofo). Now I can work with 33 megs at a time! Though I am using the DOS XCOPY command to move file/folders around, the zipcopy looks good.
DEC2002:***************
The docs are right, if you boot the computer(with the win9x zip driver installed), put in a zip disk, you get access to the first partition. But, I found out by accident, that if you have the three partition zip disk in the drive when the computer boots, ALL THREE PARTITIONS ARE AVAILABLE IN WINDOWS! Drag and drop access. I have put a snapshot pic in this file desktop.jpg.
APR2003:*****************
Been busy, finally got back to doing pofo stuff, figuring out progs I have no doc for. I have two zip100 drives, one sees all three partitions(E, F, G, no cdrom attached), the other does not(F only, still no cd rom, don't know what happened to E). The one that does has a serial number barcode on back, so I am assuming its newer, maybe a firmware upgrade. The other will, if I swap the drives without rebooting. I am looking into making the drive/Windows see the other two partitions.
FEB2004:****************
It is actually easier than the docs to get the three partitions available from Win95 without changing the Autoexec.bat or config.sys files. Just ADD New Hardware, scroll down to SCSI adapter, then choose Iomega and 100 Meg Parallel port ZIP drive. Reboot with three partition ZIP disk in drive. Drag and drop is the best way to manage the disk.
MAY2004:****************
Note that none of the drivers will read the Zip disk correctly using Win98SE(~175K bytes each partiton)! I suspect that it doesn't like the 12 bit Fat.
Dec2009:******************
Palmzip.de doesn't show anything other than the backlight now. Another site looks to have the driver. Its Here. I will have to test a later version of ZIPMAN(1.30+) to see if Win98 will work.
512K Memory upgrade:
COMING SOON!